Setup Docker slaves for Jenkins
Jenkins is
the one of the primary CI tool used in industry. Jenkins provide on cross
planform support and have master-slave configuration. Your slave could be any
operating system. Recently docker is becoming very popular for replacement of
virtualisation up to some extend.
Today I
will detail out the steps needed to make dynamically slave provision
via docker images.
Setting up Host for Docker
- You
need to have your base machine either VM or hypervisor etc and need to
install with all prerequisite. Lets install docker now.
- Once
docker is installed, you need to perform some configuration Like
- Add
the jenkins user to docker group, so that jenkins user should be able to
run docker command with proper permission and access.
sudo usermod -aG
docker jenkins
· Now, we need to configure the docker
host so that jenkins can connect to the
docker host and to access it to launch the docker container. You can
select any port you want (make sure it is not conflicting with any other
application).
vi
/etc/default/docker
Add following value in DOCKER_OPTS
-H
tcp://0.0.0.0:6789
Your complete entry of might look
like this (you may have some more info for your docker registry depending upon
your requirement).
DOCKER_OPTS="--ipv6=false
-H tcp://0.0.0.0:6789 -H unix:///var/run/docker.sock
Now, restart the docker by "service docker restart" to load
above configuration.
Docker Image (Dockerfile).
Now you need to create your
Dockerfile to create image of your docker slave.
Here is my basic docker file, Your
file may be little different than this.
FROM
evarga/jenkins-slave
#Getting image
from evarga repo
ENV
DEBIAN_FRONTEND noninteractive
RUN apt-get
update -qq && apt-get install -qqy \
apt-transport-https \
ca-certificates \
curl \
lxc
\
iptables && \
rm
-rf /var/lib/apt/lists/*
RUN echo deb
https://apt.dockerproject.org/repo ubuntu-trusty main >
/etc/apt/sources.list.d/docker.list && \
apt-key adv --keyserver hkp://p80.pool.sks-keyservers.net:80 --recv-keys
58118E89F3A912897C070ADBF76221572C52609D
ENV
DOCKER_VERSION 1.8.1-0~trusty
# Install Docker
from Docker Inc. repositories.
RUN apt-get
update && apt-get install -y docker-engine=$DOCKER_VERSION &&
rm -rf /var/lib/apt/lists/*
ADD wrapdocker
/usr/local/bin/wrapdocker
RUN chmod +x
/usr/local/bin/wrapdocker
VOLUME
/var/lib/docker
RUN apt-get
update && apt-get install -y software-properties-common
python-software-properties && add-apt-repository ppa:webupd8team/java
&& apt-get update
RUN echo
oracle-java8-installer shared/accepted-oracle-license-v1-1 select true |
/usr/bin/debconf-set-selections
RUN apt-get
install -y oracle-java8-installer oracle-java8-set-default
RUN echo
'JAVA_HOME=/usr/lib/jvm/java-8-oracle' >> /etc/environment
# Make sure that
the "jenkins" user from evarga's image is part of the
"docker"
RUN usermod -a -G
docker jenkins
#You can have
your own user and add it here, change the permission as above
#Just to make
sure we have password less access from VM to docker
RUN echo
"ssh-rsa
AAAAB3NzaC1yc2EAAAADAQABAAABAQDT4/OlCjMDacPyYvJfnBQhIRg4ldRZ7fxB7Eoa7sJgKQnV/qP2Gg29tPUb3g1k/xWmOoTOBi6XWMAaFACtYEy0vfMRkRhfEMpzmx0hSfi2jkssKJvei50wCe04t5KqY7xxgnMbRqf+XOnnQRjbwLFM9r1wgk4wR7HeE+D25hS19O7pKxAr8ByCmF3UQ4/zdvsA/gDky31E+mU01bGKgiNSBTZbXM1g48TnkvZuS/sN0uxznucx7Y61TeLz4r/nZiK18f0BNDj3AXTZQBgbwvYP0hYmf1/9ajl03fn4orjChHk58dcR8oA5VzV4rCVeu2VLEXjnoTYfuQhiD
jenkins@7213637c0b2c" >> /home/jenkins/.ssh/authorized_keys
#making sure, it
has sudo access (if you want)
RUN echo
"jenkins ALL=(ALL) NOPASSWD:ALL" >> /etc/sudoers
#RUN mkdir
/home/releasebot/
# place the
jenkins slave startup script into the container
ADD
slave-startup.sh /
# Expose the
standard SSH port
EXPOSE 22
CMD
["/slave-startup.sh"]
Docker file is pretty must very
clear and straight forward. Only tips
·
You can add other tools installation as part of default docker
image.
·
slave-startup.sh is added which can be used to start ssh demon and
wrapdocker like below
#!/bin/bash
#
start the docker daemon
/usr/local/bin/wrapdocker
&
#
start the ssh daemon
/usr/sbin/sshd
-D
Go ahead build the image and upload it to your
private repository or any where you want to.
Jenkins Configuration
Lets look at jenkins configuration
- Please install the following docker plugin in your jenkins.
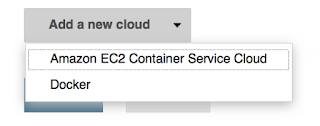
- Once you install the plugin, you will befollowing option under configuration page.
You will see Docker option in cloud like this
Select the docker and fill the detail
Here are the detail
- Name - > You can give any name for your cloud.
- Docker URL -> this is the URL of your Host where you have configured the Docker as mentioned in 1st section .
- Docker Image -> This is the connection URL and name of your docker image which you have created in 2nd section. If you are using private registry, You will need to take care of URL and image name.
- Volumes -> You can skip this part, But as complete setup i feel its needed, This section will tell you what directories to be mounted inside docker from host. This is important to keep configuration in centralise place so that docker can use them, Like .m2 folder and configurations.
Test the configuration using "Test Connection" button.
Remaining documentation can be found on jenkins plugin wiki page, https://wiki.jenkins-ci.org/display/JENKINS/Docker+Plugin


Comments
Post a Comment